Setup guide
Set up Orbitar, one step at a time.
Eight short parts, from your first sign-in to your daily work. Do them in order. Every step uses the real names you see on screen. This page is always the current version.
The screenshots are from our demo, with fake customers. Your menu shows only what your plan includes. Some steps are done by Orbitar for you; they are marked We do this by hand.

Part 1 of 8
Sign in and look around
Your system has its own address, https://yourname.orbitarisp.com. You sign in there with the admin login Orbitar made for you.
- Go to orbitarisp.com, click Sign in, and sign in with Google. Open Account. When your system is Live, your admin username and temporary password are on that page.
- Open your own address (yourname.orbitarisp.com). On Staff sign-in, type the username and password, then click Sign in. Tick Remember me only on your own phone or computer.
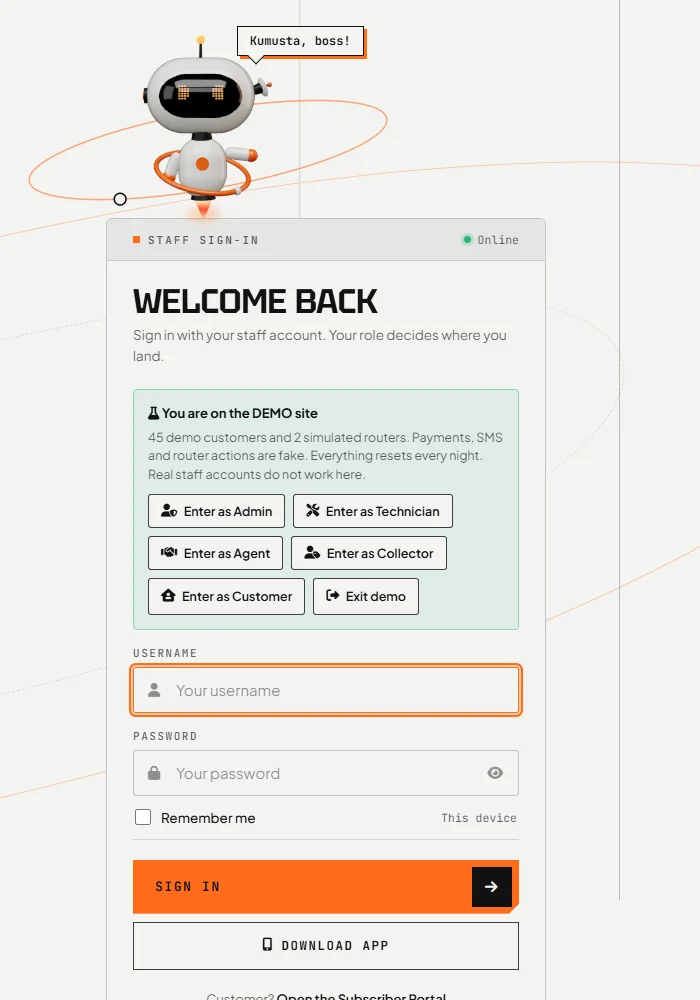
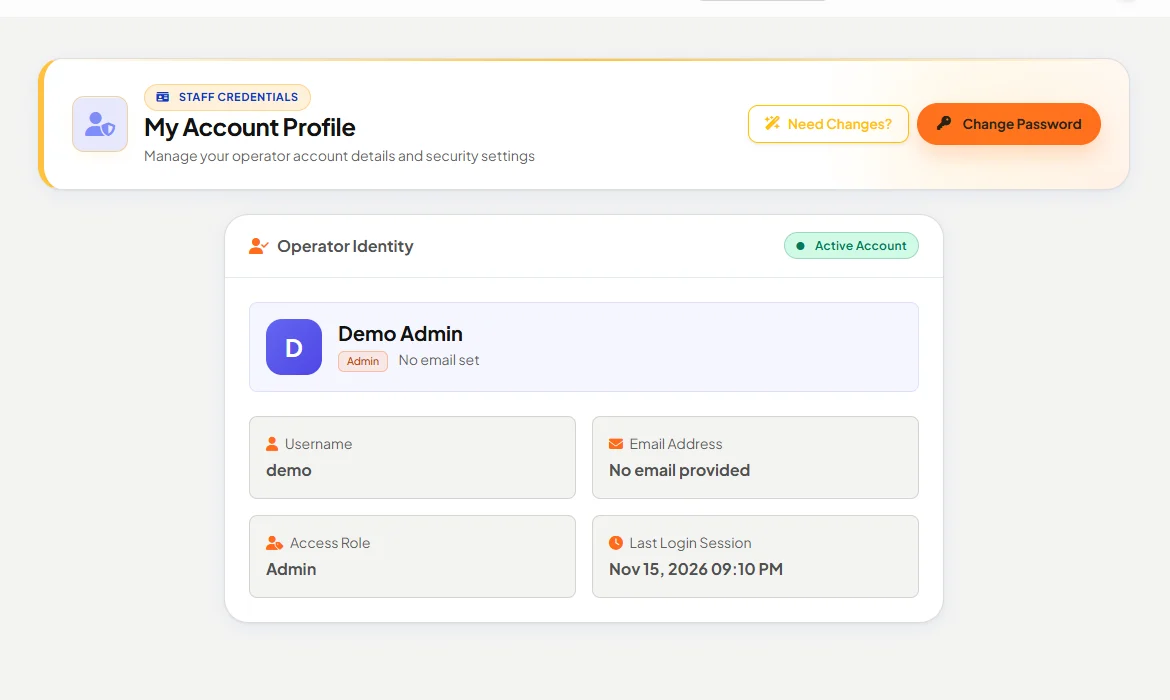
The sign-in page. (On our demo it also has the Enter as Admin buttons; yours won't.) · Tap to enlarge - Change the temporary password now. Open Administration → Settings in the menu on the left, then My Profile, then click Change Password.
Tap to enlarge - Look at the menu on the left. It only shows what your plan includes: for example Billing has Customers and Internet Plans, and Network Ops has your routers. The Dashboard is the home page.
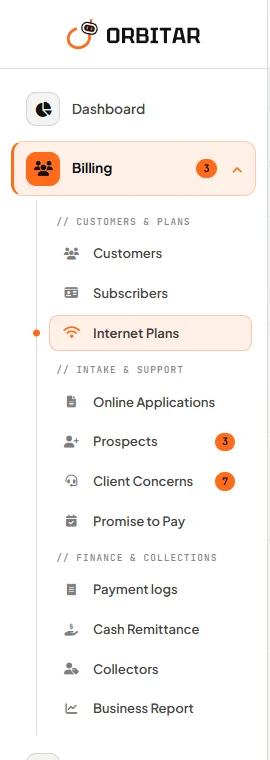
The Billing menu. · Tap to enlarge - To see what your plan includes, open Settings and look at the card Your plan. To change plan, use Account on orbitarisp.com.
Tip The screenshots in this guide come from our demo (fake customers). Your screens look the same, with your logo.
Stuck? [email protected]. Tell us your address (yourname.orbitarisp.com) and send a screenshot.
Part 2 of 8
Add your internet plans
These are the packages you sell, such as 30 Mbps for ₱799. Add them before you add customers.
- Open Billing → Internet Plans. This page lists every plan, how many subscribers are on it and its price.
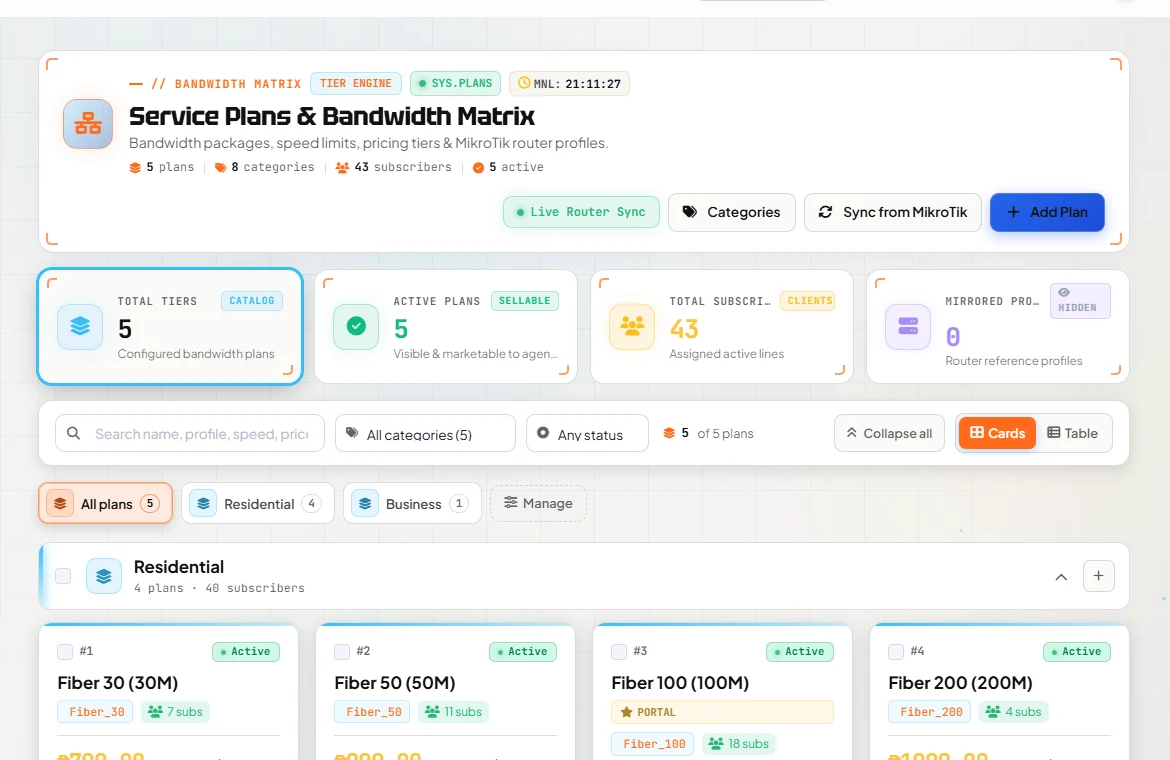
Tap to enlarge - Click Add Plan, top right.
- Fill in Plan Name, Upload Speed (Mbps), Download Speed (Mbps), Price (₱) and Validity (days) (30 for a monthly plan). In MikroTik PPPoE Profile, type the profile name your router uses for this speed, exactly as it is written there.
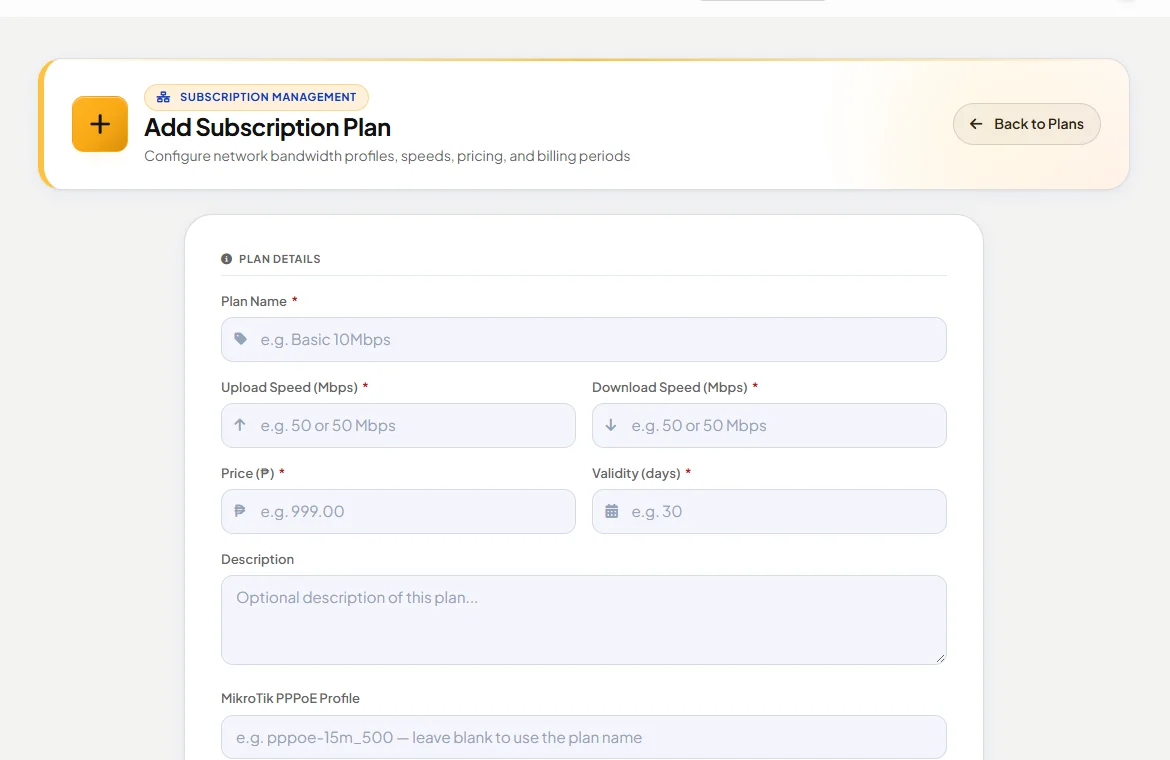
Tap to enlarge - Click Add Plan at the bottom. Repeat for each plan you sell.
Tip Already connected your router (next section)? Sync from MikroTik, on the same page, reads the profiles your router already has, so you don't type them twice.
Stuck? [email protected]. Tell us your address (yourname.orbitarisp.com) and send a screenshot.
Part 3 of 8
Connect your MikroTik router
The system talks to your router through MikroTik's API. It reads who is online, and, once you switch it on, it can add, cut off and reconnect customers for you. Connect a router sets this up with one paste: your router dials a private, encrypted tunnel to your system, so it needs RouterOS 7 and internet, and no public IP or open port.
- Open Network Ops → Mikrotik Devices. This page lists your routers, how many subscribers each one carries and whether its accounts match your records.
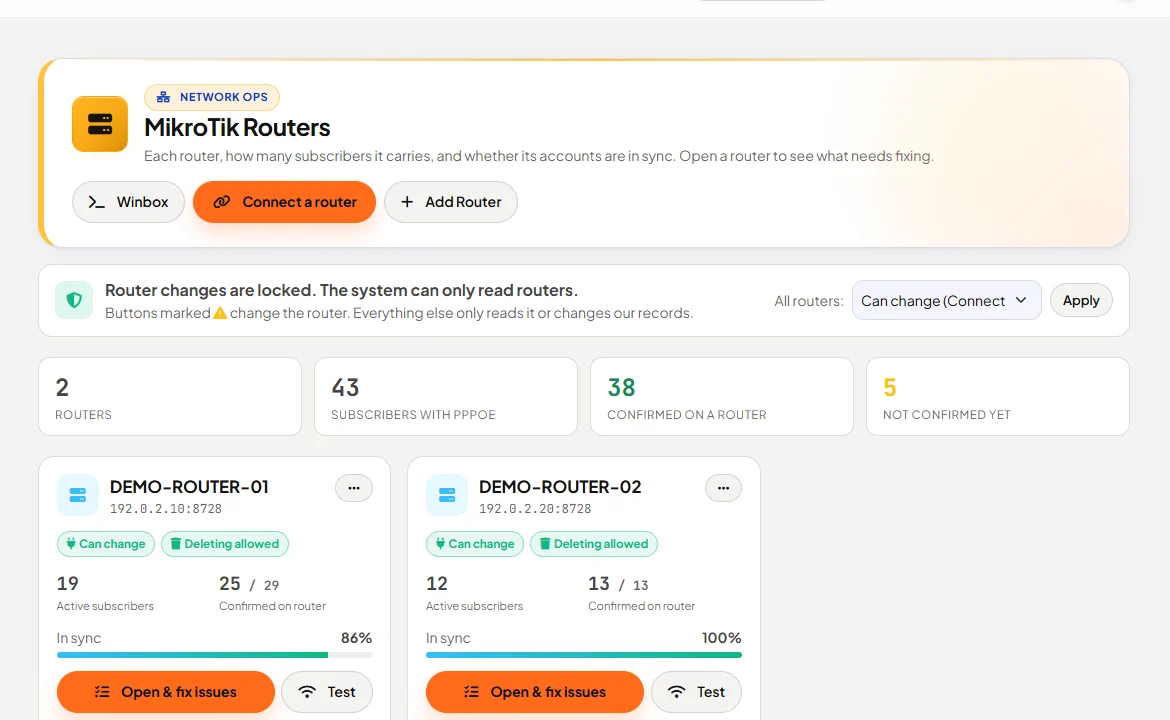
A new system starts in safe mode, so you see this notice. · Tap to enlarge - Click Connect a router. Choose A new router and type a name, or choose A router already in Orbitar. Click Make the script.
- Click Copy. In WinBox, open New Terminal and paste it there once. The script works once, for 30 minutes. It holds no password: your router makes its own tunnel key, and the system sends the password for its own limited router account straight to the router.
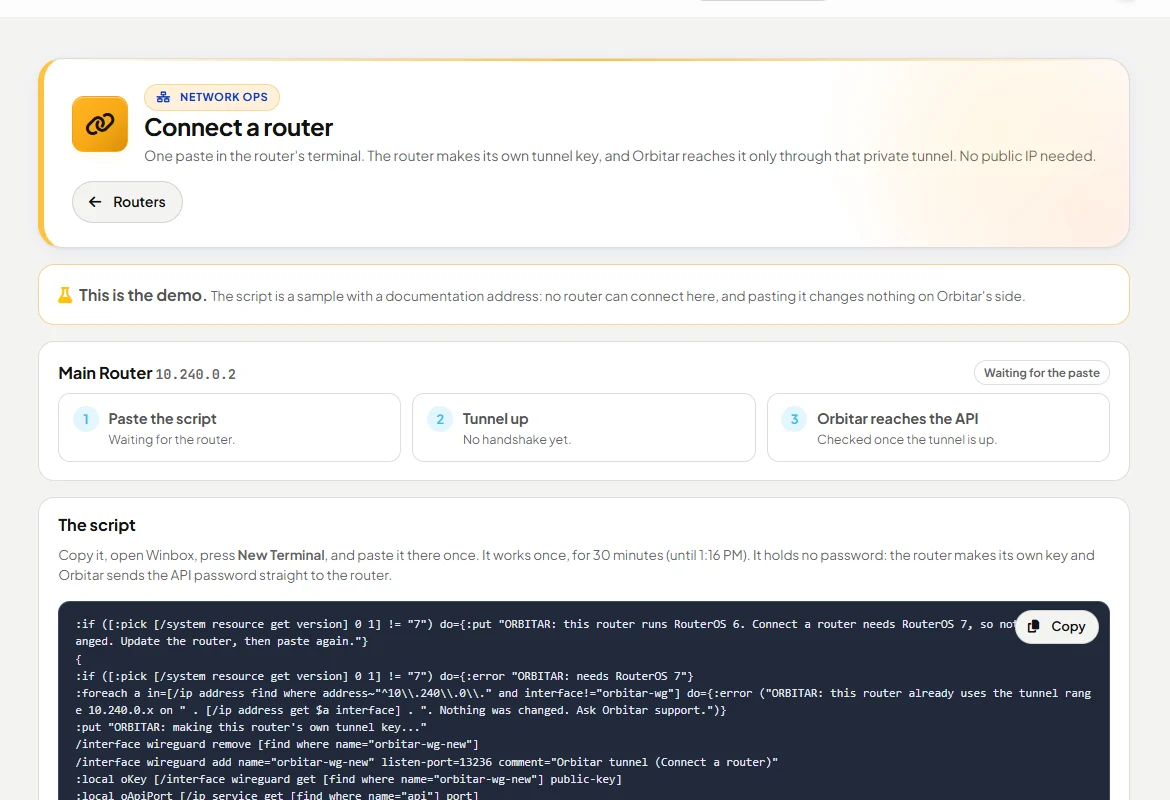
Tap to enlarge - Wait for ORBITAR: connected in the terminal (up to two minutes). On the page, the three steps turn green: the router's key arrived, the tunnel is up, and the system reaches the router. The router now shows on Mikrotik Devices with its tunnel and the time of its last check-in.
- Safe mode. Every new system starts with the notice Router changes are locked. The system can only read routers. In safe mode nothing on your router is changed. Buttons marked with a warning sign change the router; everything else only reads it or changes your records in Orbitar. That is on purpose, so you can check everything before it touches your network.
Tip You switch router changes on yourself, in Settings → Router changes, once your plans and customers look right. See Go live. On a router still on RouterOS 6, the paste only prints a message and changes nothing: update it first (in WinBox, System → Packages → Check For Updates).
We do this by hand · Already reach your router another way? Add Router still takes the router's address, API user and password by hand. Use it only on a private link: a router on a public address is better connected with Connect a router, so its passwords never cross the internet.
Stuck? [email protected]. Tell us your address (yourname.orbitarisp.com) and send a screenshot.
Part 4 of 8
Bring in your customers
You have four ways. Pick the one that fits. Add your internet plans first, so every customer lands on the right plan.
Which plan? Basic, Starter, Growth and Plus record installs by hand (no dispatch). Sending a technician to each install is part of the Field and Network plans.
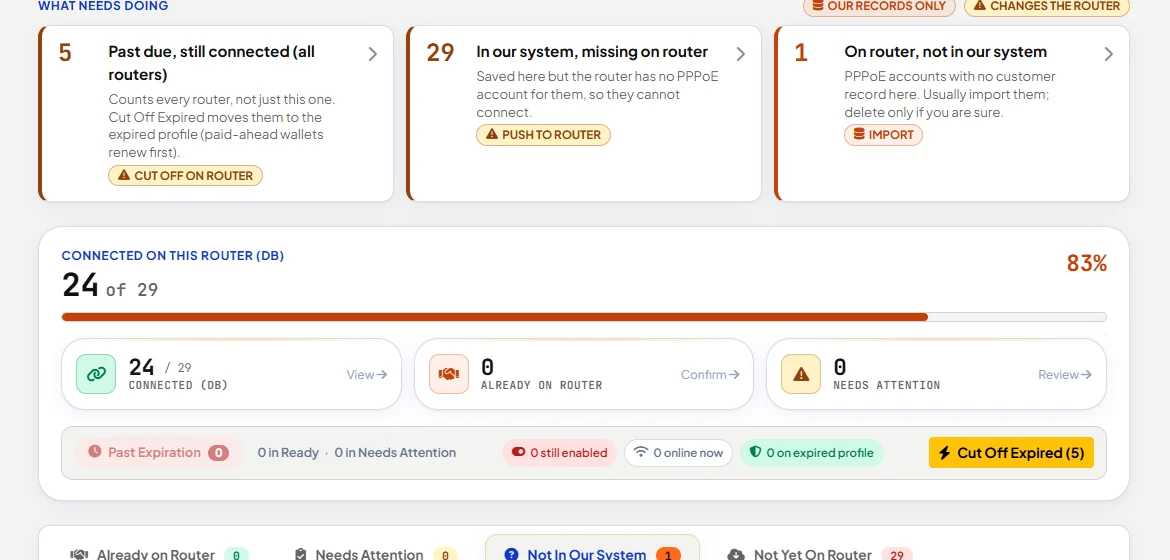
- A. From your router (best if your customers already have PPPoE accounts). Open Network Ops → Mikrotik Devices, then Open & fix issues on your router. The page counts what is on the router but not in Orbitar.
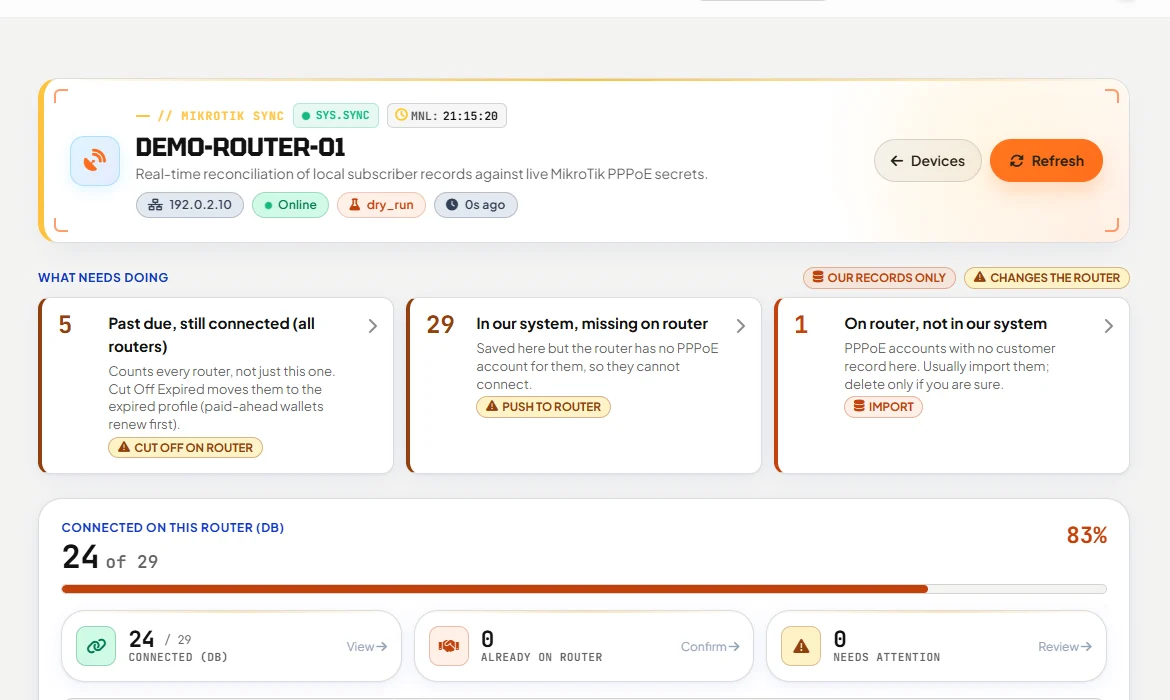
The Sync Manager. The last box is the accounts to import. · Tap to enlarge - Click the tab Not In Our System. Tick the accounts you want, then click Import (one account) or Bulk Import. Importing only fills in your records; it does not change the router. Check the list Flagged — check these first before importing it.
Tap to enlarge - B. One by one. Open Billing → Customers and click Add Customer. Step 1 is the Policy Agreement: tick the six things you explained to the customer, then click Agree All & Next Step.
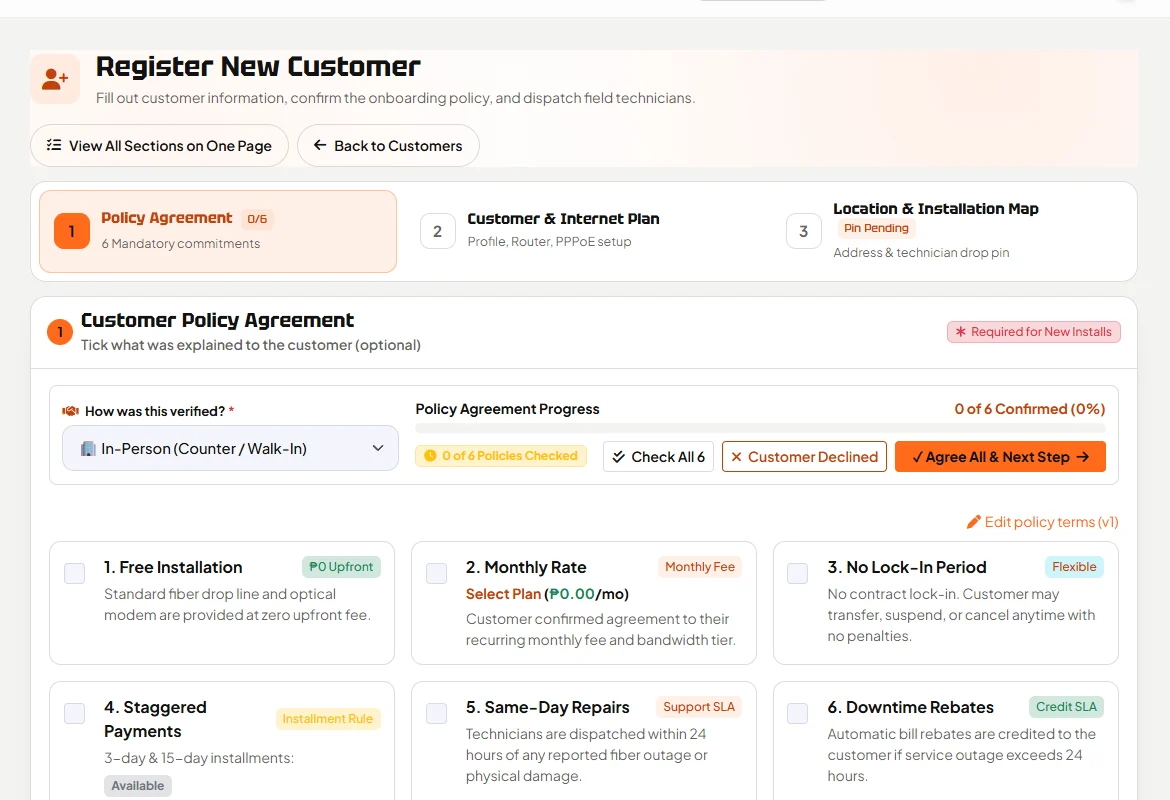
Tap to enlarge - Step 2, Customer & Internet Plan: choose the Service Type, type the Full Legal Name and Mobile Phone Number, choose the Subscription Plan and the Serving MikroTik Router, and set the PPPoE Account Username and Password. Step 3 is the Street Address & Landmark and Barangay. Click Save Customer & Dispatch Installation.
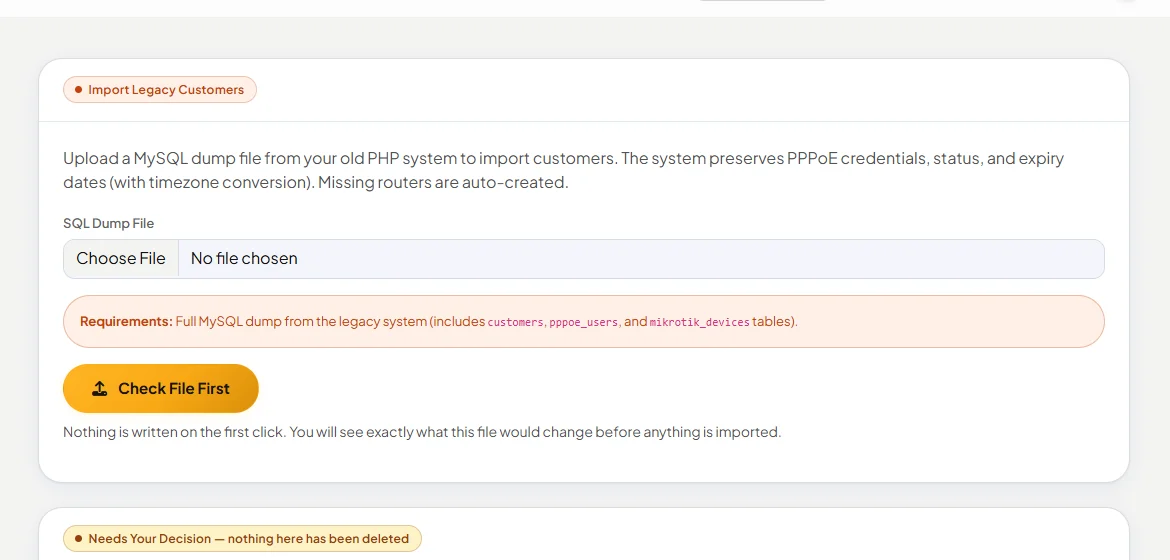
- C. From an old system. Open Administration → Admin Panel, then Import Data. Upload the MySQL dump file of the old PHP system and click Check File First. Nothing is written on that click: you see what would change, then you decide.
Tap to enlarge - D. From Excel or a CSV file. Open Administration → Admin Panel, then Import customers. Click Template to download the column names: Full name and Plan are required (the plan must match one of your plans by name); Phone, Address, Barangay, PPPoE username and Due date are optional. A .csv or .xlsx file, up to 5 MB and 5,000 customers.
- Choose your file and click Check file. You see every row first, with the problems to fix; nothing is saved until you click Import. Imports make customer records only: nothing is sent to a router and no SMS or bill goes out. Connect each customer to their router account in the Sync Manager (way A). You can Undo a whole import while none of its customers has been changed.
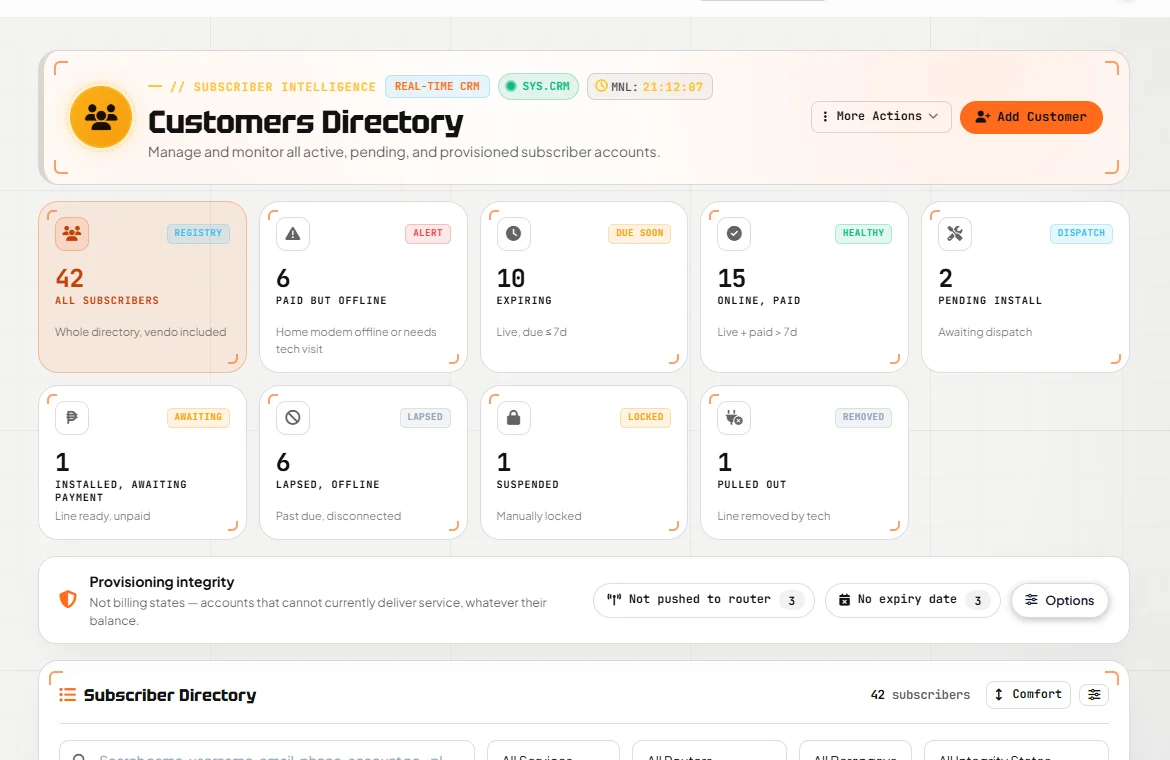
- When you are done, open Billing → Customers and look at Provisioning integrity, for example Not pushed to router and No expiry date. These are accounts that cannot work yet. Fix them before you go live.
Tap to enlarge
Stuck? [email protected]. Tell us your address (yourname.orbitarisp.com) and send a screenshot.
Part 5 of 8
Set up payments and SMS
Both use your own accounts: customer payments go to your own HitPay, and texts use credits you buy from your SMS provider. They are not required to start; cash and bank payments you record by hand always work.
Which plan? Online payments, SMS and the customer portal are in every plan. You need your own HitPay and SMS accounts; Orbitar does not sell SMS credits.
- Open Administration → Admin Panel and scroll to Integrations & API Keys. You see three cards: SMS API Key, Email Receipts (SMTP) and Payment API Key. A red Off means not set up yet.
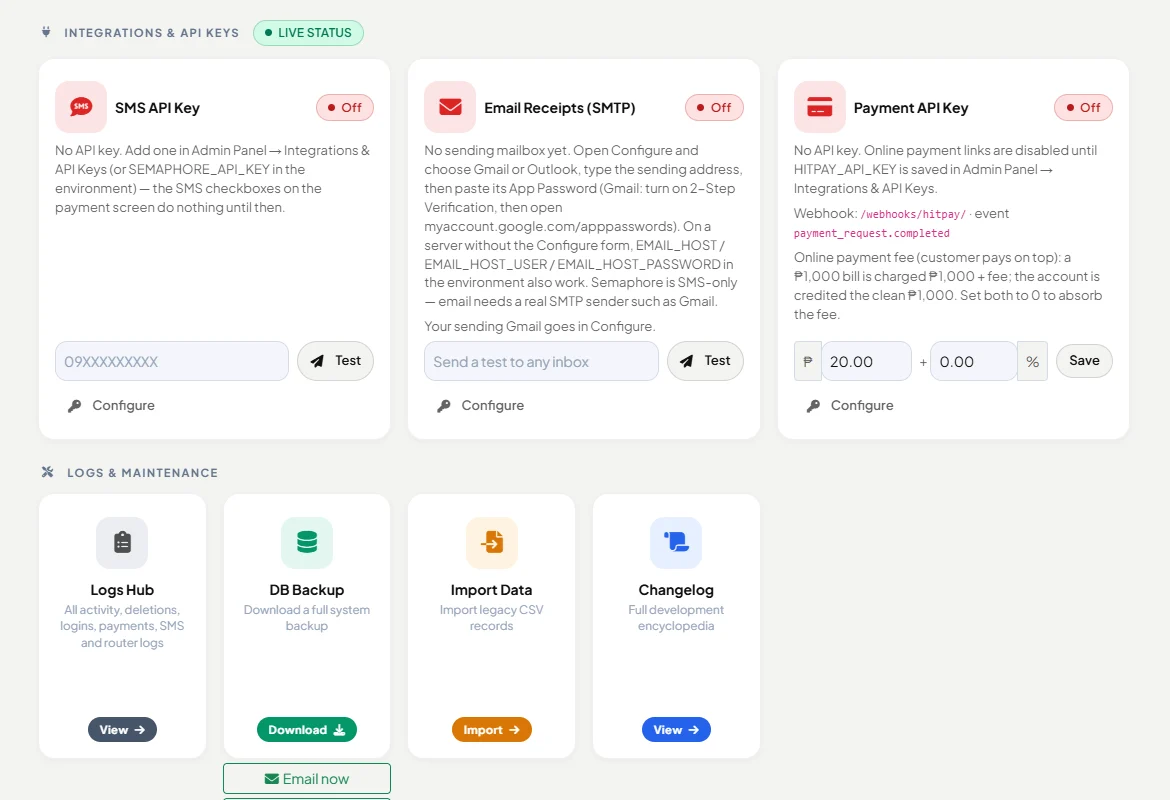
Tap to enlarge - Online payments. On the Payment API Key card click Configure. Choose HitPay ( PayMongo, Xendit and Maya show as coming soon). Paste your API key and Webhook salt from your HitPay account. Copy the Webhook URL and paste it into HitPay, with the event payment_request.completed. Keep Sandbox on while you test; turn it off for real payments. Click Save payment keys.
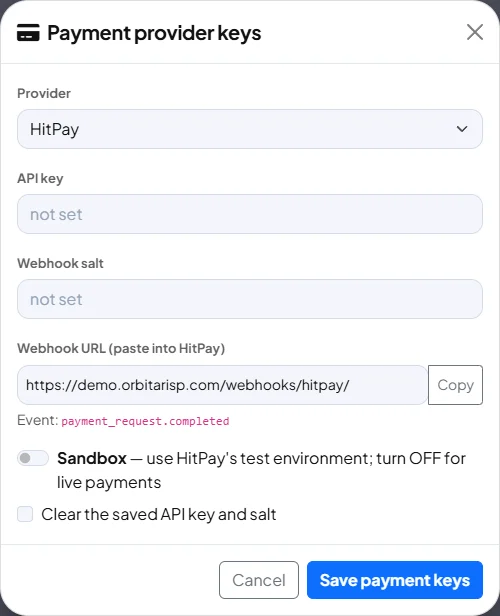
Your Webhook URL shows your own address. · Tap to enlarge - On the same card you can set the online payment fee: what customers pay on top, so you receive the full bill. Set both boxes to 0 to pay the fee yourself.
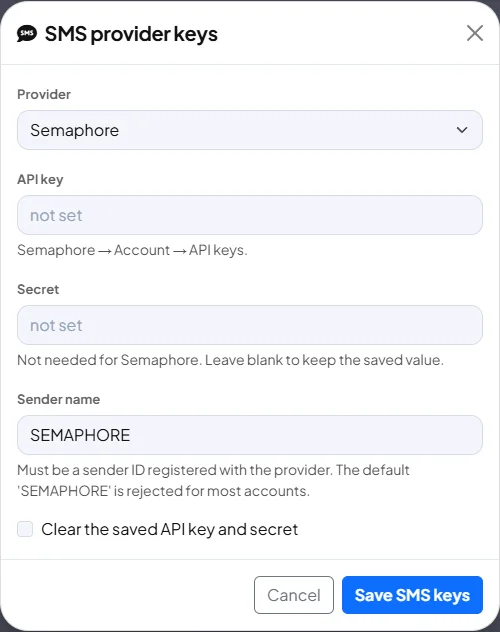
- SMS. On the SMS API Key card click Configure. Choose Semaphore, Twilio or Other provider (HTTP link), paste your key, and type your Sender name. It must be a sender name registered with your provider. Click Save SMS keys, then Test to send yourself a text.
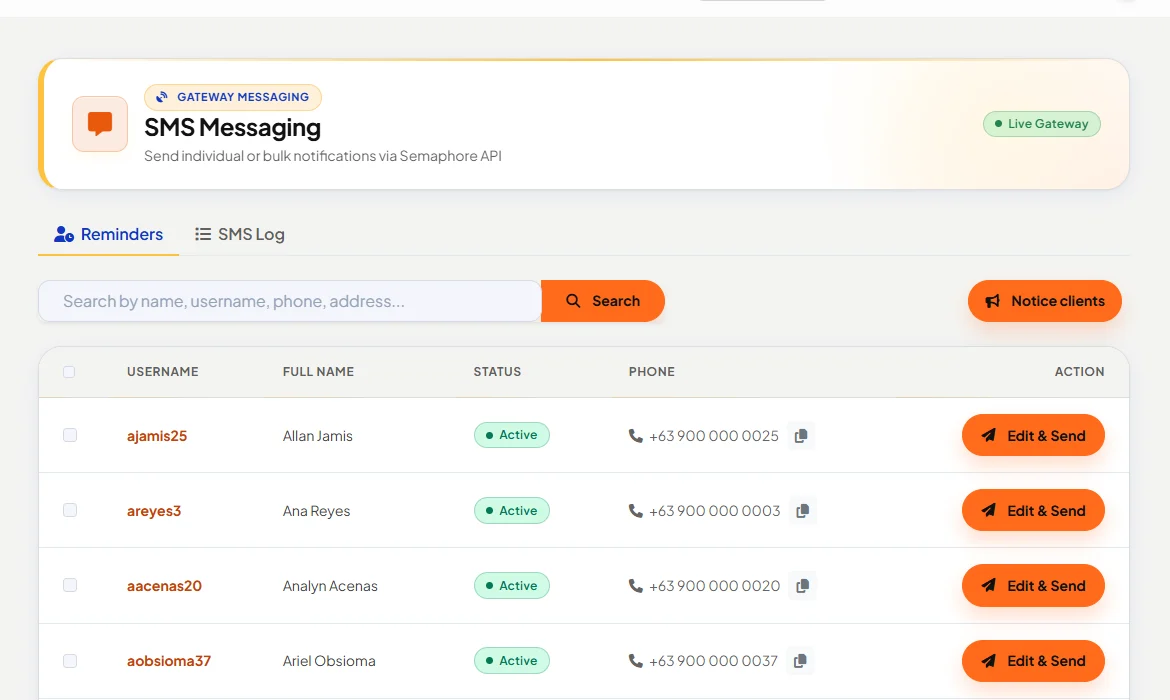
Tap to enlarge - To choose which texts go out by themselves, open Admin Panel → SMS Settings. To change the words, open Message Templates. To text a group, open Settings → SMS Messaging and use Notice clients.
Tap to enlarge - Email receipts are optional. On Email Receipts (SMTP) click Configure, choose Gmail or Outlook, and paste an App Password (not your normal password).
Stuck? [email protected]. Tell us your address (yourname.orbitarisp.com) and send a screenshot.
Part 6 of 8
Add your staff
Give each person their own login and a role. The role decides what they can open.
Which plan? Technician, Dispatch and Agent roles are for the plans that have them: dispatch and the Tech Portal are in Field and Network, agents are in Network.
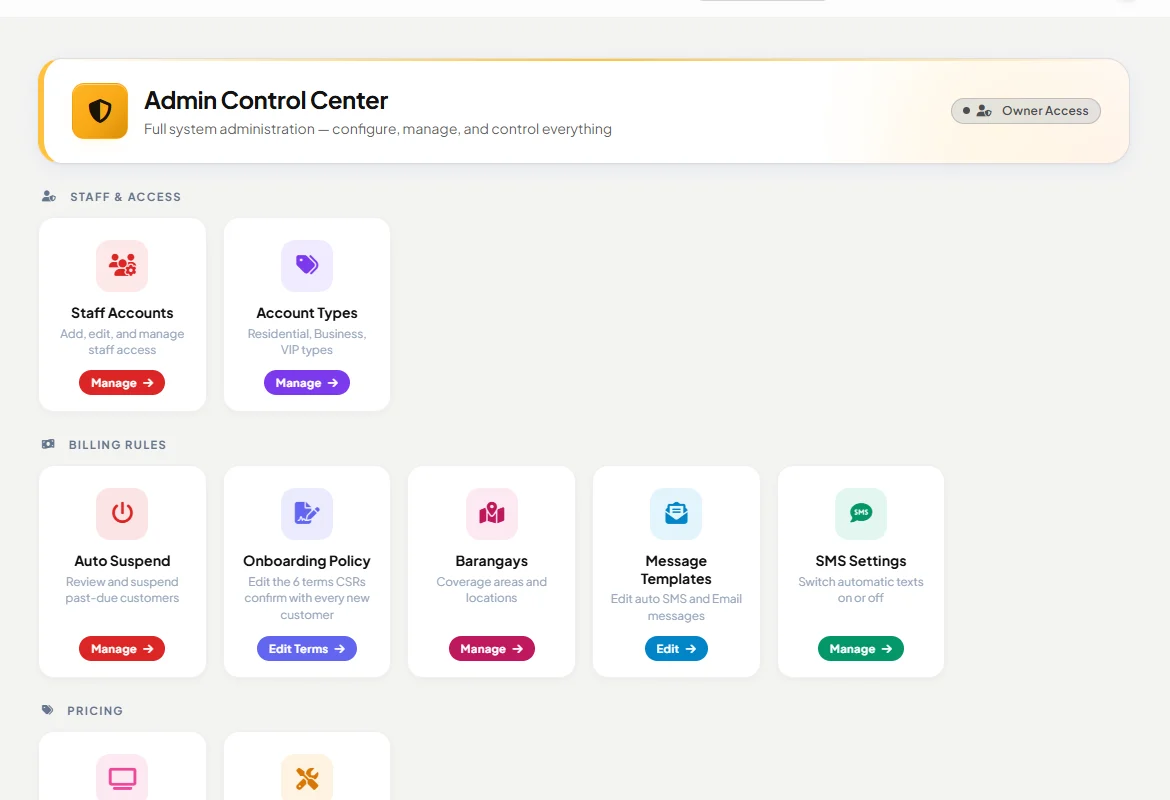
- Open Administration → Admin Panel and click Manage on Staff Accounts.
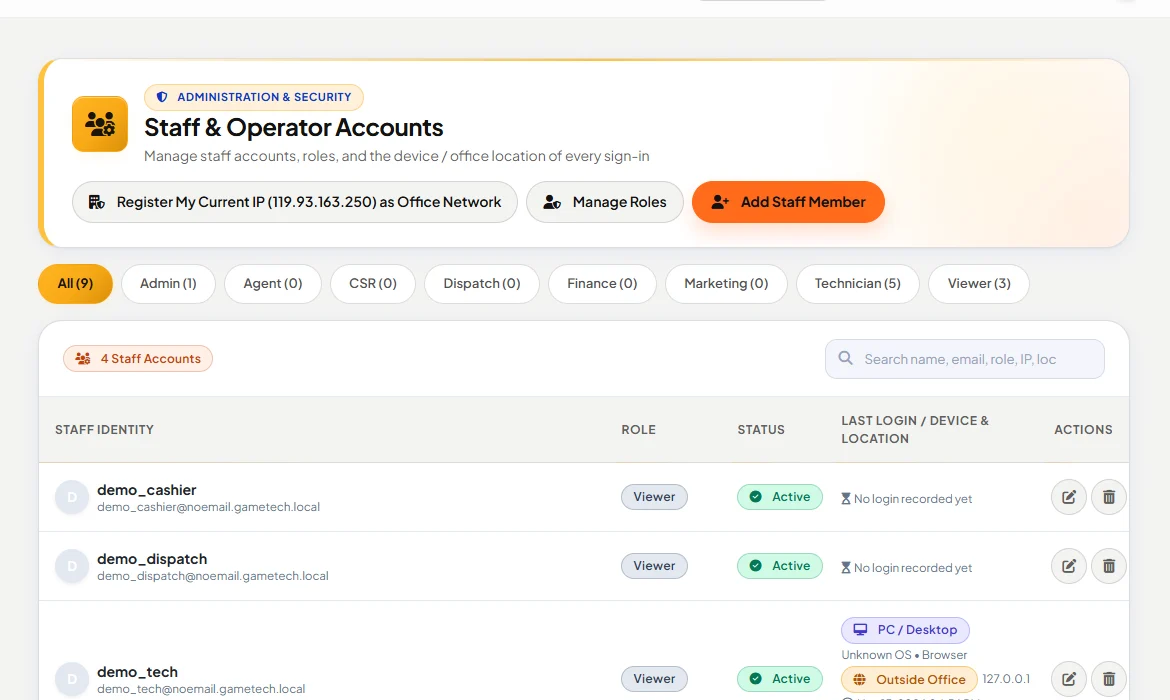
Tap to enlarge - Click Add Staff Member. Fill in Username, Full Name, Role, Status and a Password, then click Add Staff. The roles are Admin, Agent, CSR, Dispatch, Finance, Marketing and Technician. Give the owner and one trusted person Admin, and nobody else.
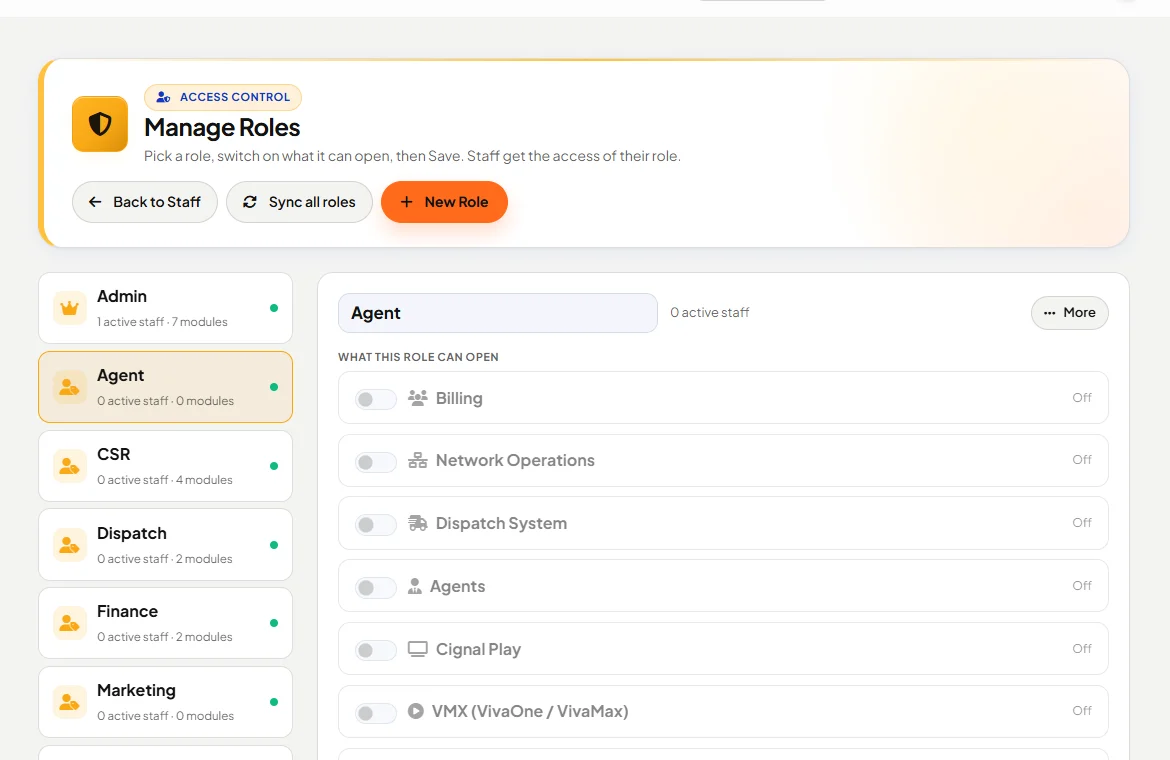
Tap to enlarge - To change what a role can open, click Manage Roles, pick the role, switch on what it can open, and click save. Everyone with that role gets the change.
Tap to enlarge - Turn on 2-step sign-in for your own login first: open My Profile, click Manage on 2-step sign-in, scan the QR code with Google or Microsoft Authenticator, type the 6-digit code, and keep the 10 recovery codes somewhere safe. Then open Settings → 2-step sign-in (owner only) and tick the roles that must use it. A lost phone: sign in with a recovery code, or an Admin clicks Reset 2-step sign-in on that person's Edit Staff page. (Not on the demo, so every visitor can still enter with one click.)
Stuck? [email protected]. Tell us your address (yourname.orbitarisp.com) and send a screenshot.
Part 7 of 8
Check, then go live
Before the system starts cutting off late customers, check it. Do this in order. Take your time: this is the one step that touches your customers' internet.
- Open Settings and find Cut-off & late payments. Set Grace days (days after the due date before cut-off; 0 is right away), Longest promise to pay and Late payments, and click Save on each.
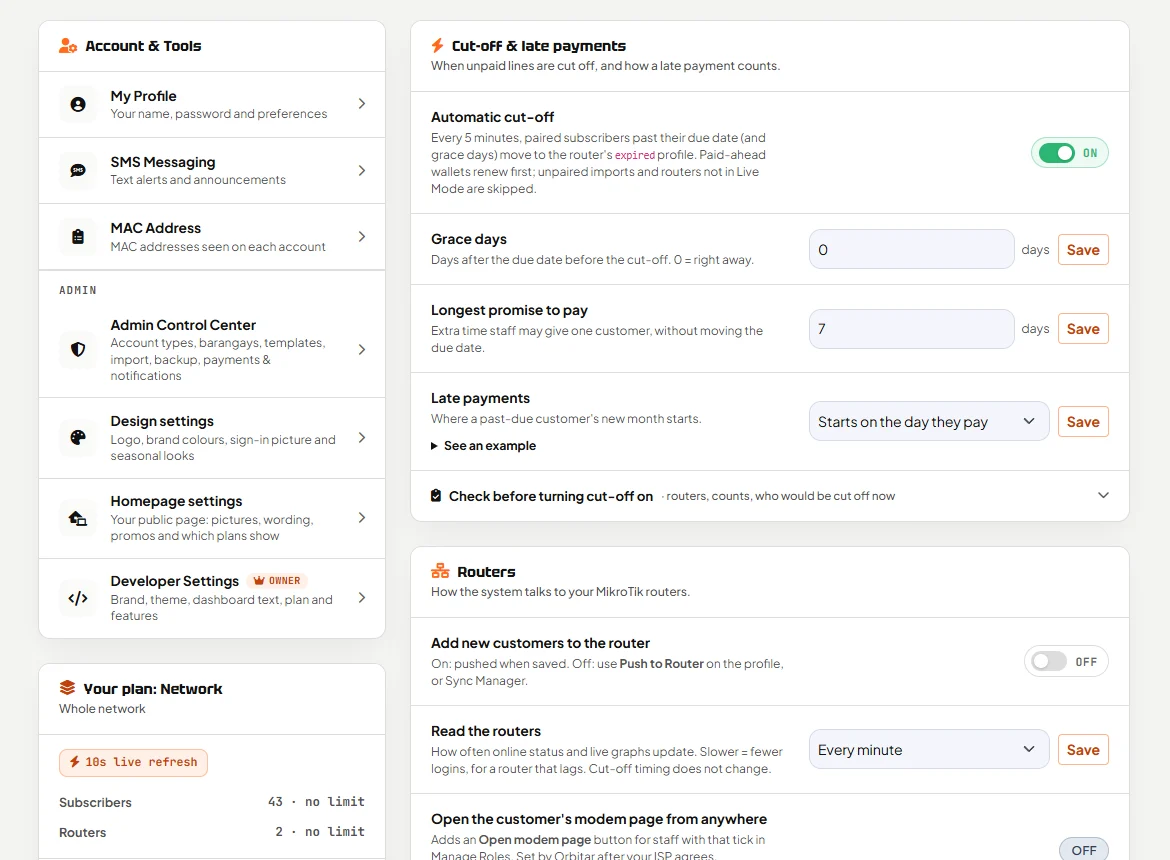
Tap to enlarge - Click Check before turning cut-off on. It shows, for each router, whether the system can read it, whether router changes are on, and exactly how many customers would be cut off right now. While the router cannot be read or written, nobody is cut off.
- Under Routers in the same page, Add new customers to the router is off at first. Turn it on when you are ready: new customers are then added to the router when you save them.
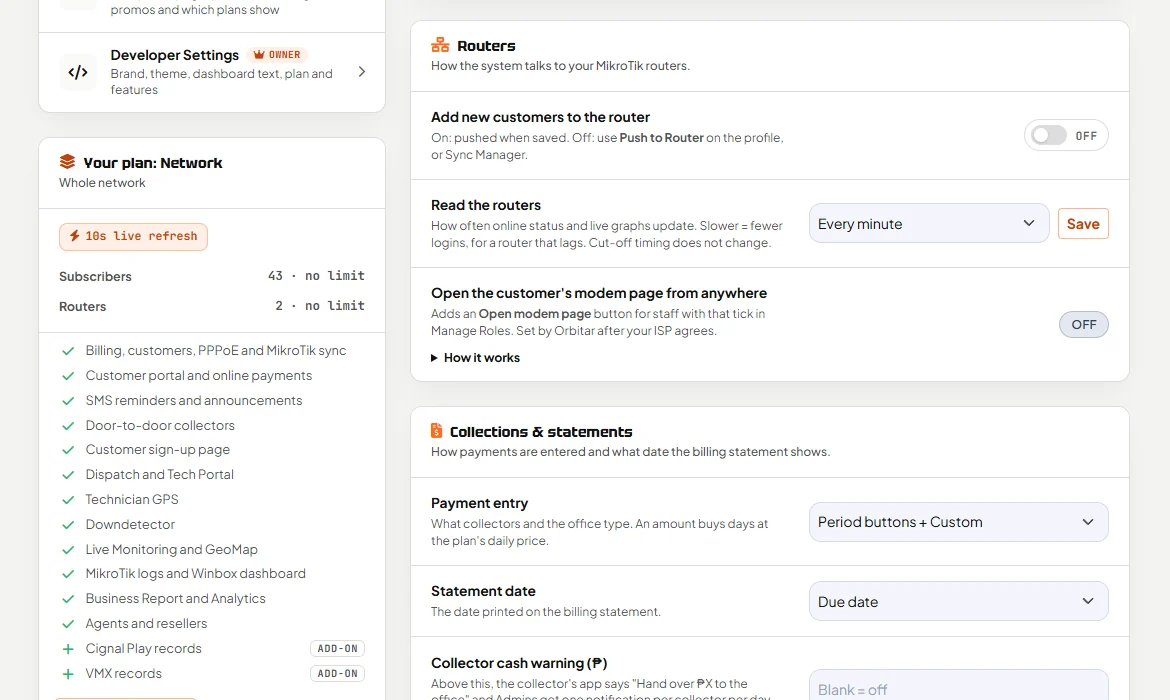
Tap to enlarge - Under Your business, upload your Logo and fill in your Office numbers. Customers see them on the sign-in pages, the portal and receipts.
- Protect your data: open Administration → Admin Panel, find Daily backup copy, choose a backup password and tick Send me a copy every day. Orbitar emails you a password-protected file each day; keep the password safe, we cannot open it for you. DB Backup downloads a copy any time.
- Try it with one customer: record a payment (see Daily work), then check the customer's status. Automatic cut-off is on from the start, but it does nothing while router changes are locked. If you are not ready for it, switch it off before the next step.
- Go live. Sign in with the owner's login (only the owner can do this) and open Settings → Router changes. The page checks your routers first: at least one must be reachable and none blocked. It also shows what starts: how many paired customers are past due and how many would be cut off right away (after your grace days).
- Type GO LIVE in the box and click Go live. From then on the system cuts off unpaid lines, reconnects customers when you save a payment, and adds or edits PPPoE accounts. Each router's own switch on the MikroTik Devices page still applies. Click Lock router changes any time to stop it; nothing on the router is undone. Still using another billing system on the same routers? Stay locked until you stop using it.
Stuck? [email protected]. Tell us your address (yourname.orbitarisp.com) and send a screenshot.
Part 8 of 8
Your daily work
The few things you will do every day.
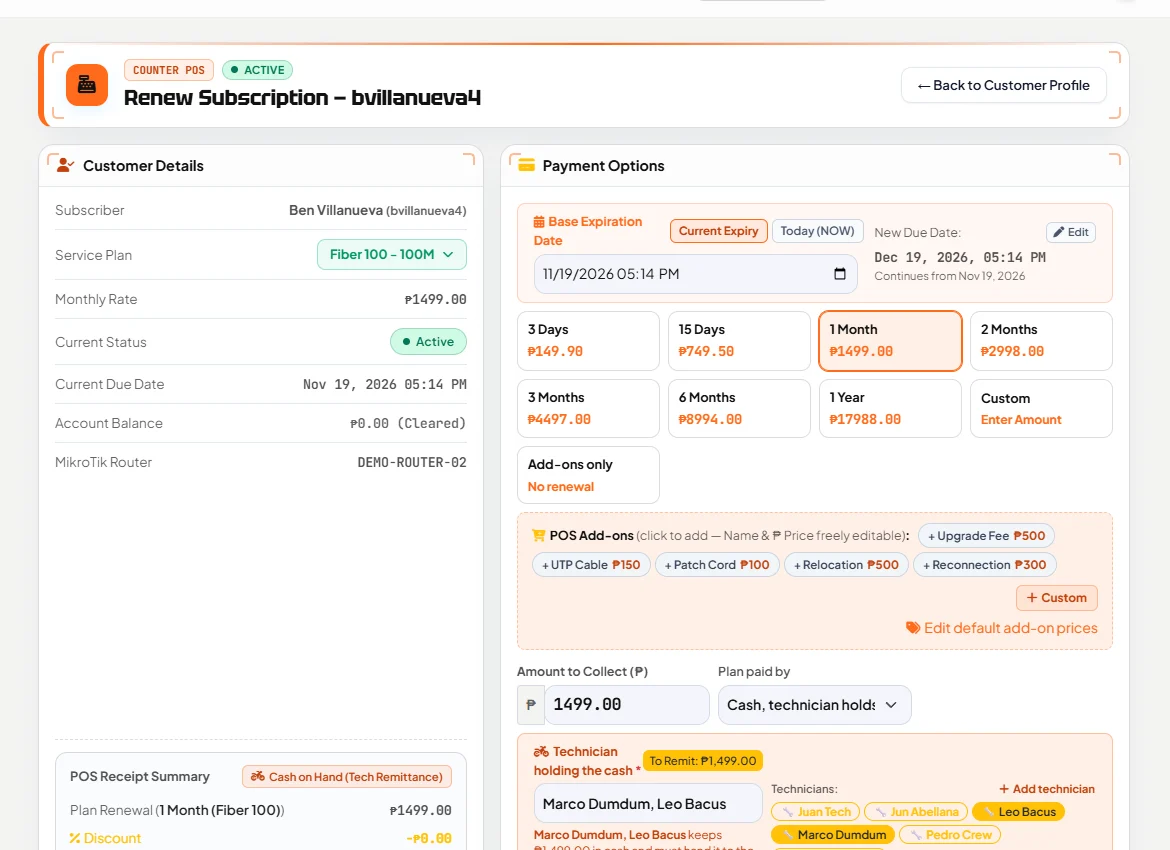
- Record a payment. Open Billing → Customers, open the customer, click Renew / Pay Bill. Choose how much time they paid for (for example 1 Month), set Plan paid by (cash, GCash, bank transfer...), add the Reference No. for GCash or bank, and click Confirm Payment. Tick SMS Receipt to text them.
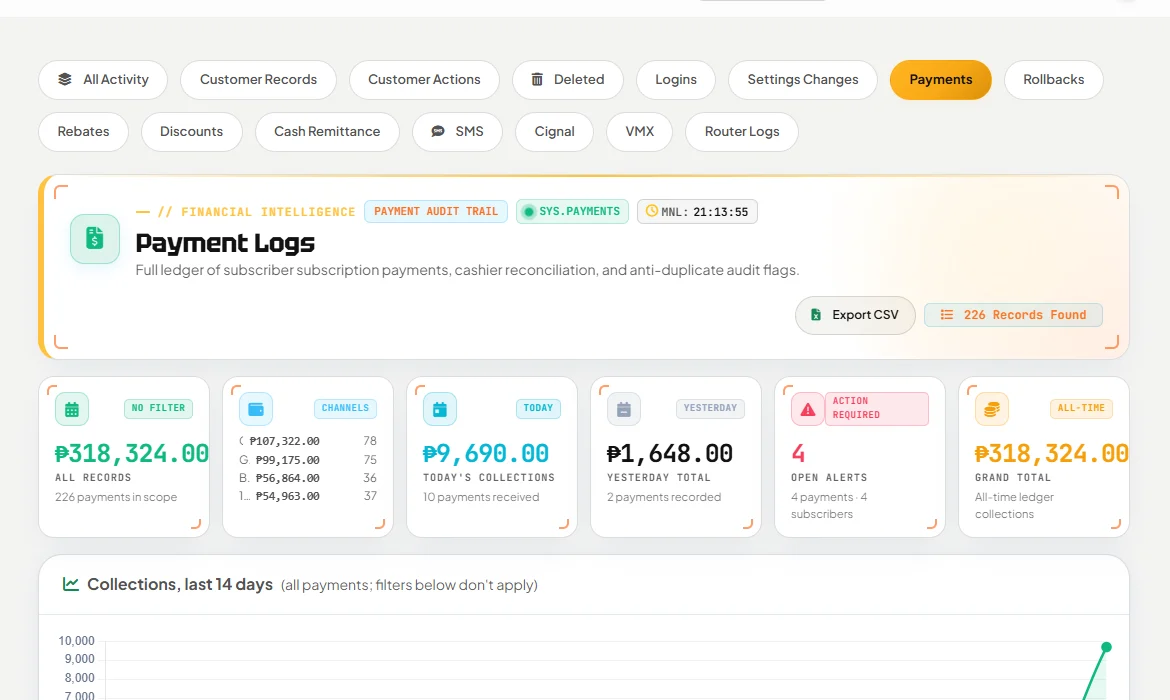
Tap to enlarge - Check the money. Open Billing → Payment logs. Filter by method, and use the note button to add a remark to a payment.
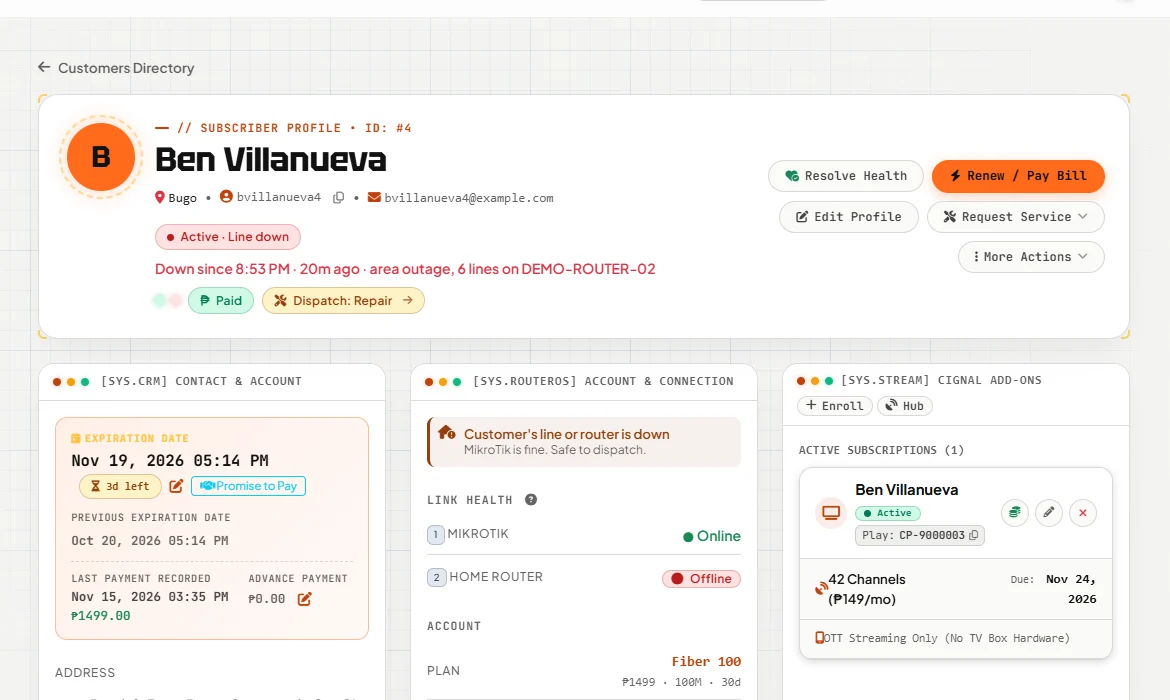
Tap to enlarge - Chase who is due. On Billing → Customers, the counters Due soon and Lapsed show who needs a call. To text a group, use Settings → SMS Messaging → Notice clients.
- A customer asks for more time. Open the customer, click More Actions → Promise to Pay, and set how long. The automatic cut-off respects it. All promises are listed in Billing → Promise to Pay.
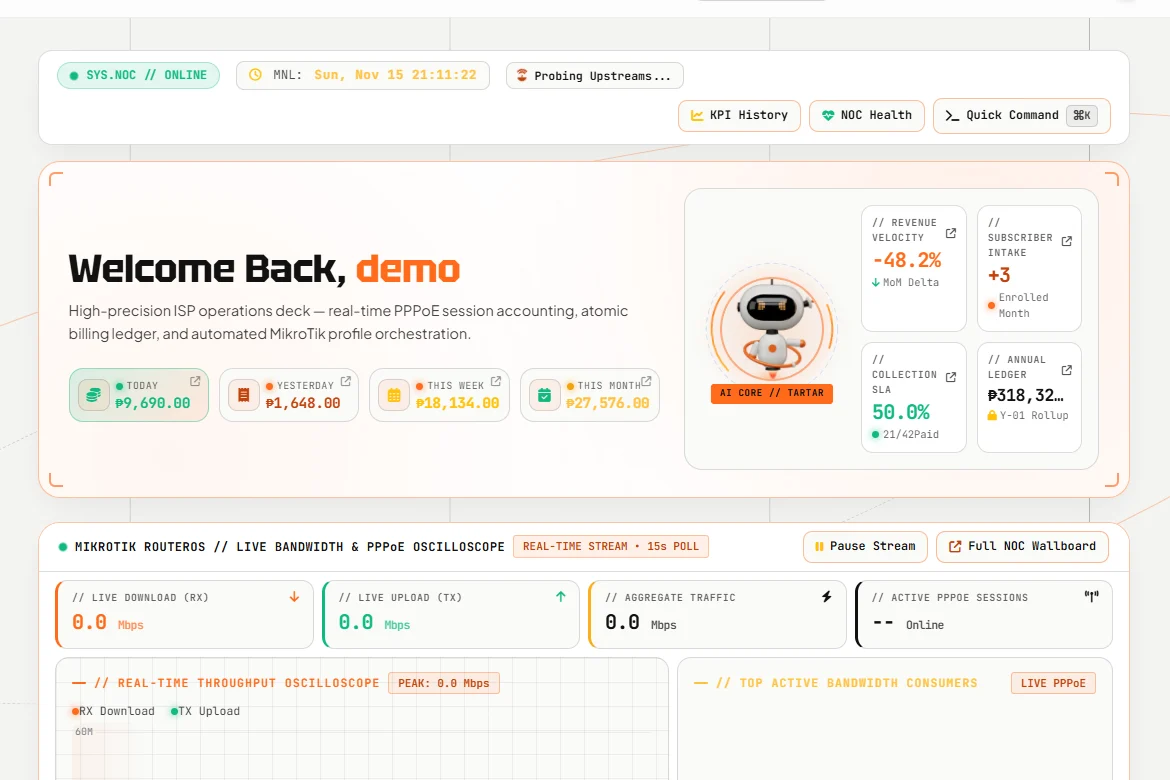
Tap to enlarge - See the day at a glance. The Dashboard shows what you collected today, this week and this month, how many customers have paid, and who is online. Problems reported by customers arrive in Billing → Client Concerns.
Tap to enlarge - See your network on the map. Open Network Ops → GeoMap. Each dot is a customer: green is online, red is offline, grey is cut off, black is for pull-out. The small squares are NAP boxes with their used and total ports; click one to see who is on each port, and a line joins each house to its NAP box. To record a new NAP box, click Add NAP here and then the spot on the map. Not on the map lists customers that still need a pin.
- Load your NAP boxes from Excel. Open Network Ops → NAP Boxes → Import. First upload your NAP box list (name, latitude, longitude, ports, PLC or FBT, OLT, PON port), then on Port list upload who is on which port (PPPoE username or Account No., NAP name, port). Click Sample file to see the columns. Every row is checked first and nothing is saved while any row has a problem; each problem is shown by row so you can fix the file. Undo takes a whole import back while nothing in it has been changed. Customers without a port shows who is still missing, with the nearest boxes that have a free port.
- Set or change a customer's NAP port. Open the customer, click Edit Profile and use Fiber path / NAP port under the map pin: it lists the NAP boxes nearest the pin, and Set or Change shows every port of a box. The port is saved at once; Save Changes does not change it. A port used by an active or pending customer cannot be taken. A port held by a customer who is no longer active can be taken over after you confirm; that customer is then marked Modem not yet pulled out, and Network Ops → NAP Boxes → Modems to pull out lists them with Request pull-out and Modem already returned. Only roles with the NAP boxes Edit tick in Manage Roles can change ports.
- Get the port from the technician (Field and Network). On the Done form of a new installation or a relocation, the technician picks the NAP box and taps the port from a grid of every port. In Settings → NAP boxes & installations, choose Optional (the office can set the port later) or Required (Done needs the box and port, or NAP box not in the list with its name, and that job is flagged for you). A technician can ask for a port held by a customer who is no longer active; it is taken over only when you approve the job. To let technicians set or fix the port on their own finished jobs for 30 days, tick Set or correct the NAP box and port after Done for their role in Manage Roles; a port someone else holds always goes to the office.
- Know who needs a pull-out. When a technician asks for a port that someone else holds, everyone with the NAP boxes Edit tick gets one alert (bell and phone) that names the customer on that port and opens Network Ops → NAP Boxes → Modems to pull out. Its first tab, Promise not kept, lists customers whose promise to pay ended unpaid and who still have a modem at the house, with the promised day and the days overdue; they leave the list by themselves when they pay or an admin gives a new promise. To get an alert for these too, turn on Tell the office when a broken promise leaves a customer for pull-out in Settings → NAP boxes & installations (it starts off). Nothing is cut and no job is made until you click Request pull-out. On the NAP pages, green means the line is online, red offline, and black for pull-out or no longer active.
- Put your network on a wall TV. Open Network Ops → NOC Screen in the TV's browser (it opens full screen in a new tab). It shows how many customers are online, offline and cut off, each router, NAP boxes where 3 or more lines went down at once, the latest disconnects and the map, and it updates by itself. It shows names and PPPoE usernames only. For the TV, make a role in Manage Roles with only Network Ops → NOC screen (wall TV) ticked and sign the TV in with it: a login with only that tick stays signed in for 7 days. Give that role any other tick and it signs out after 8 hours without use, like every other login. When the TV is signed out, the screen says so with a Sign in again button.
- See each modem's fiber signal. Once your OLT is connected, the system reads each modem's signal (dBm) from it every 10 minutes and shows it on the customer's Fiber path, on the NAP port board, on the map and on the NOC screen. NAP Boxes → Weak signal lists the modems with a weak or bad signal, worst first, so you can send a technician before the customer calls. Connecting an OLT is set up by Orbitar for each OLT brand: message us your OLT's brand, model and firmware, and send its read-only login to us privately. Until then the screens say No signal readings yet.
- Optional: Refer a friend. Let your customers win a cash prize for bringing a new customer. Open Settings → Refer a friend, switch it on, type the prize in pesos and click Save Refer a friend. Customers then see it on their portal Home with their own link. When a friend is installed and has paid, the prize shows under Billing → Online Applications → Referral prizes: hand it over, choose how you gave it and click Prize given. It is off until you switch it on, and it needs your sign-up page on.
Stuck? [email protected]. Tell us your address (yourname.orbitarisp.com) and send a screenshot.